Building a smart fan controller with Raspberry Pi
Implementing a 3.3V to 5V Level Shifter for Optimal One-Wire Sensor Performance
One challenge we face is that the Dallas One-Wire humidity and temperature sensor we plan to use works better with 5V levels, even though it may function at 3.3V. The Raspberry Pi outputs 3.3V on its GPIO4 pin for the One-Wire protocol, but we need to shift this to 5V for optimal sensor performance. So, we need a level shifter to convert the 3.3V signal from the Pi to a 5V signal that the sensors can work with.

Normally, you could just connect the Raspberry Pi's GPIO4 pin directly to the Dallas One-Wire sensors with a 3.3V pull-up resistor, and you'd be good to go. When level shifting, we still need a pull-up resistor on the One-Wire data line, the only difference is that it can be less powerful since it only needs to pull a short line from the Pi to the level shifter.
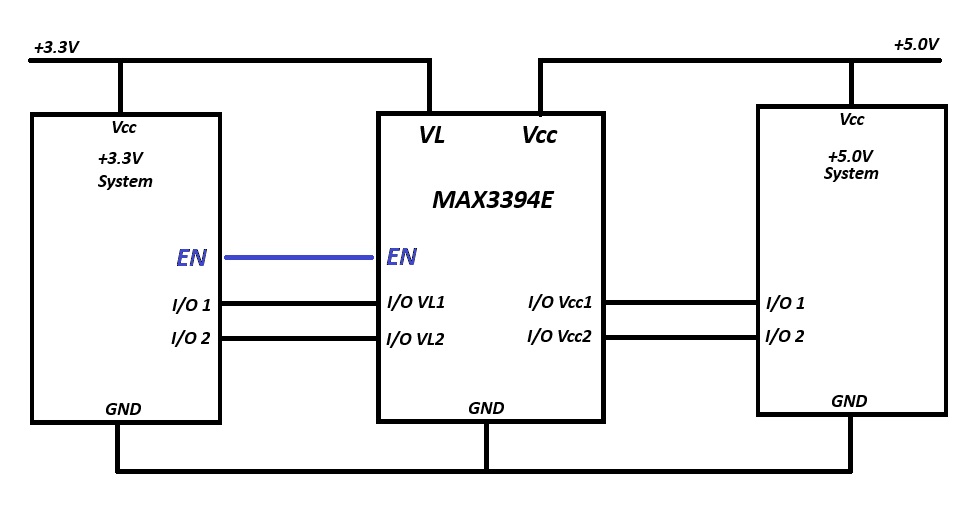
Here's a simplified diagram of how a level shifter works(specifically the max3394e):

For data level shifting, I found the MAX3394E, a cost-effective and reasonably fast level shifter. While it's not designed specifically for the Dallas One-Wire protocol (its datasheet mentions SPI, I2C, and Microwire), it should work just fine. The MAX3394E supports speeds up to 1MB/s, which is well beyond the few KB/s our One-Wire network will use. In addition to level shifting, it offers benefits like driving larger loads than the Raspberry Pi and built-in ESD protection—both crucial for running a large One-Wire network, and that we get for free by using it.
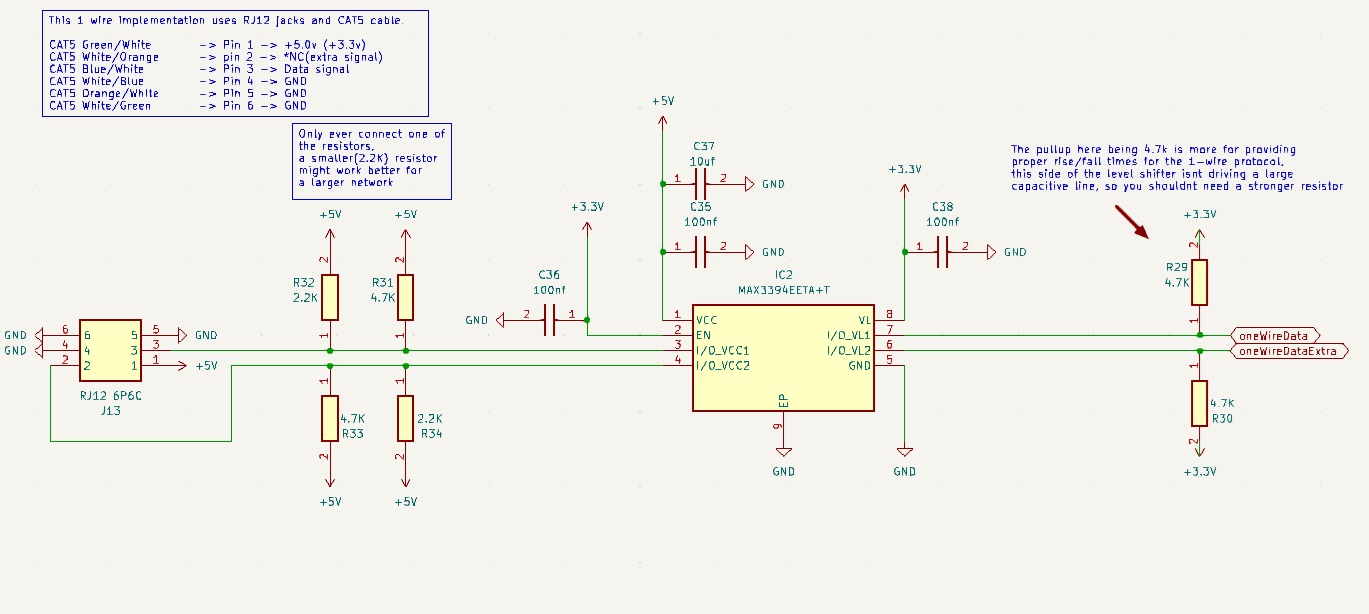
I created the following schematic for connecting the MAX3394E to our One-Wire network and Raspberry Pi, with options for a 2.2kΩ or 4.7kΩ pull-up resistor depending on the network size. The 5V side of the One-Wire network ends with an RJ12 connector, making it easy to connect and disconnect sensors to our board.

Additionally, I routed an extra One-Wire line because the MAX3394E can shift two signals. It seemed smart to plan for future expansion in case we need to drive another One-Wire line from our board.